2014 Q5(4)
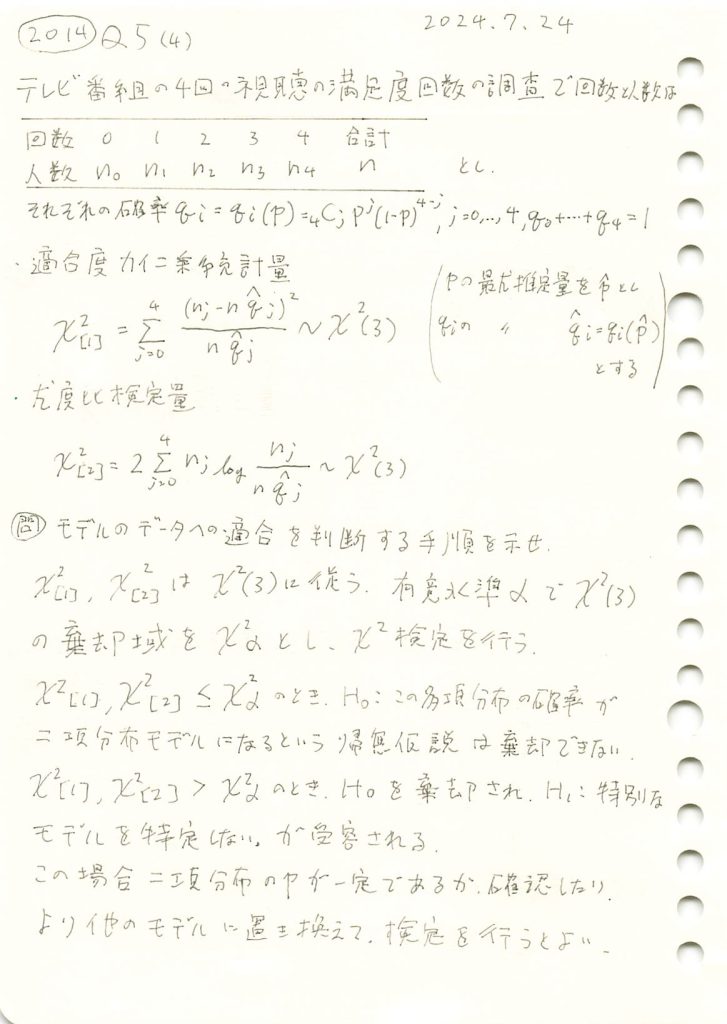
テレビ番組の視聴満足回数の調査で満足と答えた回数のそれぞれ人数の適合度検定を実施し適合を判断する手順を述べました。
コード
多項確率![]() が、
が、![]() に忠実に基づく場合と、各番組または各回答者の満足度が異なるモデルにおいて、カイ二乗統計量、尤度比統計量、およびp-値を計算し、モデルの適合性を比較します。
に忠実に基づく場合と、各番組または各回答者の満足度が異なるモデルにおいて、カイ二乗統計量、尤度比統計量、およびp-値を計算し、モデルの適合性を比較します。
import numpy as np
from scipy.stats import chi2
import matplotlib.pyplot as plt

# シミュレーションの設定
n = 100  # 回答者数
p_true = 0.6  # 真の成功確率(忠実なモデル)
categories = np.arange(5)  # カテゴリ (0~4)
n_simulations = 1000  # シミュレーション回数

# 忠実なモデルの確率 q_j
qj_true = [np.math.comb(4, j) * (p_true ** j) * ((1 - p_true) ** (4 - j)) for j in categories]

# 統計量を記録するリスト
chi_squared_true = []
likelihood_ratio_true = []
chi_squared_noisy_program = []
likelihood_ratio_noisy_program = []
chi_squared_noisy_responder = []
likelihood_ratio_noisy_responder = []

# 二項分布に従わない (qj_noisy_program): q_j をランダムに変更してズラす
qj_noisy_program = np.array(qj_true) + np.random.uniform(-0.1, 0.1, size=len(qj_true))
qj_noisy_program = np.clip(qj_noisy_program, 0, None)  # 確率が0未満にならないようにする
qj_noisy_program = qj_noisy_program / np.sum(qj_noisy_program)  # 確率なので正規化

# 各回答者の満足度が異なる場合(qj_noisy_responder)をランダム設定
p_responders = np.random.uniform(0.35, 0.85, size=n)
qj_noisy_responder = np.zeros(len(categories))
for p in p_responders:
    qj_responder = [np.math.comb(4, j) * (p ** j) * ((1 - p) ** (4 - j)) for j in categories]
    qj_noisy_responder += qj_responder
qj_noisy_responder /= np.sum(qj_noisy_responder)

# シミュレーション開始
for _ in range(n_simulations):
    # 忠実なモデル(均一)
    obs_true = np.random.multinomial(n, qj_true)
    exp_true = n * np.array(qj_true)
    chi2_stat_true = np.sum((obs_true - exp_true) ** 2 / exp_true)  # カイ二乗統計量
    likelihood_stat_true = 2 * np.sum(obs_true * np.log(obs_true / exp_true, where=(obs_true > 0)))  # 尤度比統計量
    chi_squared_true.append(chi2_stat_true)
    likelihood_ratio_true.append(likelihood_stat_true)

    # 各番組の満足度が異なる場合
    obs_noisy_program = np.random.multinomial(n, qj_noisy_program)
    exp_noisy_program = n * np.array(qj_true)
    chi2_stat_noisy_program = np.sum((obs_noisy_program - exp_noisy_program) ** 2 / exp_noisy_program)  # カイ二乗統計量
    likelihood_stat_noisy_program = 2 * np.sum(obs_noisy_program * np.log(obs_noisy_program / exp_noisy_program, where=(obs_noisy_program > 0)))  # 尤度比統計量
    chi_squared_noisy_program.append(chi2_stat_noisy_program)
    likelihood_ratio_noisy_program.append(likelihood_stat_noisy_program)

    # 各回答者の満足度が異なる場合
    obs_noisy_responder = np.random.multinomial(n, qj_noisy_responder)
    exp_noisy_responder = n * np.array(qj_true)
    chi2_stat_noisy_responder = np.sum((obs_noisy_responder - exp_noisy_responder) ** 2 / exp_noisy_responder)  # カイ二乗統計量
    likelihood_stat_noisy_responder = 2 * np.sum(obs_noisy_responder * np.log(obs_noisy_responder / exp_noisy_responder, where=(obs_noisy_responder > 0)))  # 尤度比統計量
    chi_squared_noisy_responder.append(chi2_stat_noisy_responder)
    likelihood_ratio_noisy_responder.append(likelihood_stat_noisy_responder)

# 平均値を計算
mean_chi2_true = np.mean(chi_squared_true)
mean_likelihood_true = np.mean(likelihood_ratio_true)
mean_chi2_noisy_program = np.mean(chi_squared_noisy_program)
mean_likelihood_noisy_program = np.mean(likelihood_ratio_noisy_program)
mean_chi2_noisy_responder = np.mean(chi_squared_noisy_responder)
mean_likelihood_noisy_responder = np.mean(likelihood_ratio_noisy_responder)

# 各統計量に対応するp値を計算
p_value_chi2_true = 1 - chi2.cdf(mean_chi2_true, df=3)
p_value_likelihood_true = 1 - chi2.cdf(mean_likelihood_true, df=3)
p_value_chi2_noisy_program = 1 - chi2.cdf(mean_chi2_noisy_program, df=3)
p_value_likelihood_noisy_program = 1 - chi2.cdf(mean_likelihood_noisy_program, df=3)
p_value_chi2_noisy_responder = 1 - chi2.cdf(mean_chi2_noisy_responder, df=3)
p_value_likelihood_noisy_responder = 1 - chi2.cdf(mean_likelihood_noisy_responder, df=3)

# 結果の出力
print(f"忠実なモデル(均一)の平均カイ二乗統計量: {mean_chi2_true:.4f}, 平均p値: {p_value_chi2_true:.4f}")
print(f"忠実なモデル(均一)の平均尤度比統計量: {mean_likelihood_true:.4f}, 平均p値: {p_value_likelihood_true:.4f}")
print(f"各番組の満足度が異なる場合の平均カイ二乗統計量: {mean_chi2_noisy_program:.4f}, 平均p値: {p_value_chi2_noisy_program:.4f}")
print(f"各番組の満足度が異なる場合の平均尤度比統計量: {mean_likelihood_noisy_program:.4f}, 平均p値: {p_value_likelihood_noisy_program:.4f}")
print(f"各回答者の満足度が異なる場合の平均カイ二乗統計量: {mean_chi2_noisy_responder:.4f}, 平均p値: {p_value_chi2_noisy_responder:.4f}")
print(f"各回答者の満足度が異なる場合の平均尤度比統計量: {mean_likelihood_noisy_responder:.4f}, 平均p値: {p_value_likelihood_noisy_responder:.4f}")

# カイ二乗分布のPDFを計算
x = np.linspace(0, 20, 500)  # x軸の範囲
pdf = chi2.pdf(x, df=3)  # 自由度3のPDF

# グラフの描画
plt.figure(figsize=(10, 6))
plt.plot(x, pdf, label="自由度3のカイ二乗分布", linewidth=2)
plt.axvline(mean_chi2_true, color="blue", linestyle="--", label=f"忠実モデルのカイ二乗: {mean_chi2_true:.2f}")
plt.axvline(mean_likelihood_true, color="cyan", linestyle="--", label=f"忠実モデルの尤度比: {mean_likelihood_true:.2f}")
plt.axvline(mean_chi2_noisy_program, color="green", linestyle="--", label=f"番組ごとに異なるカイ二乗: {mean_chi2_noisy_program:.2f}")
plt.axvline(mean_likelihood_noisy_program, color="lime", linestyle="--", label=f"番組ごとに異なる尤度比: {mean_likelihood_noisy_program:.2f}")
plt.axvline(mean_chi2_noisy_responder, color="red", linestyle="--", label=f"回答者ごとに異なるカイ二乗: {mean_chi2_noisy_responder:.2f}")
plt.axvline(mean_likelihood_noisy_responder, color="magenta", linestyle="--", label=f"回答者ごとに異なる尤度比: {mean_likelihood_noisy_responder:.2f}")
plt.xlabel("$X^2$ 値", fontsize=12)
plt.ylabel
plt.ylabel("確率密度", fontsize=12)
plt.title("自由度3のカイ二乗分布と統計量", fontsize=14)
plt.legend(fontsize=12)  # ここで凡例を表示
plt.grid(alpha=0.5)
plt.show()
忠実なモデル(均一)の平均カイ二乗統計量: 4.1751, 平均p値: 0.2432
忠実なモデル(均一)の平均尤度比統計量: 4.3247, 平均p値: 0.2285
各番組の満足度が異なる場合の平均カイ二乗統計量: 13.2002, 平均p値: 0.0042
各番組の満足度が異なる場合の平均尤度比統計量: 16.4412, 平均p値: 0.0009
各回答者の満足度が異なる場合の平均カイ二乗統計量: 10.3066, 平均p値: 0.0161
各回答者の満足度が異なる場合の平均尤度比統計量: 8.5302, 平均p値: 0.0362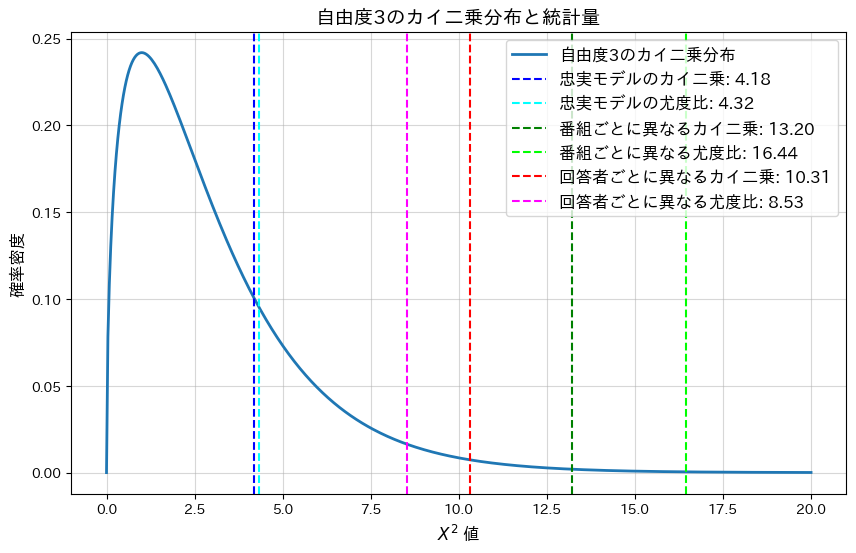
忠実なモデルの平均p-値は大きく、モデルによく適合していることが分かります。一方、各番組または各回答者の満足度が異なるモデルではp-値が0.05以下となり、モデルがデータに適合していないことが分かります。
2014 Q5(3)
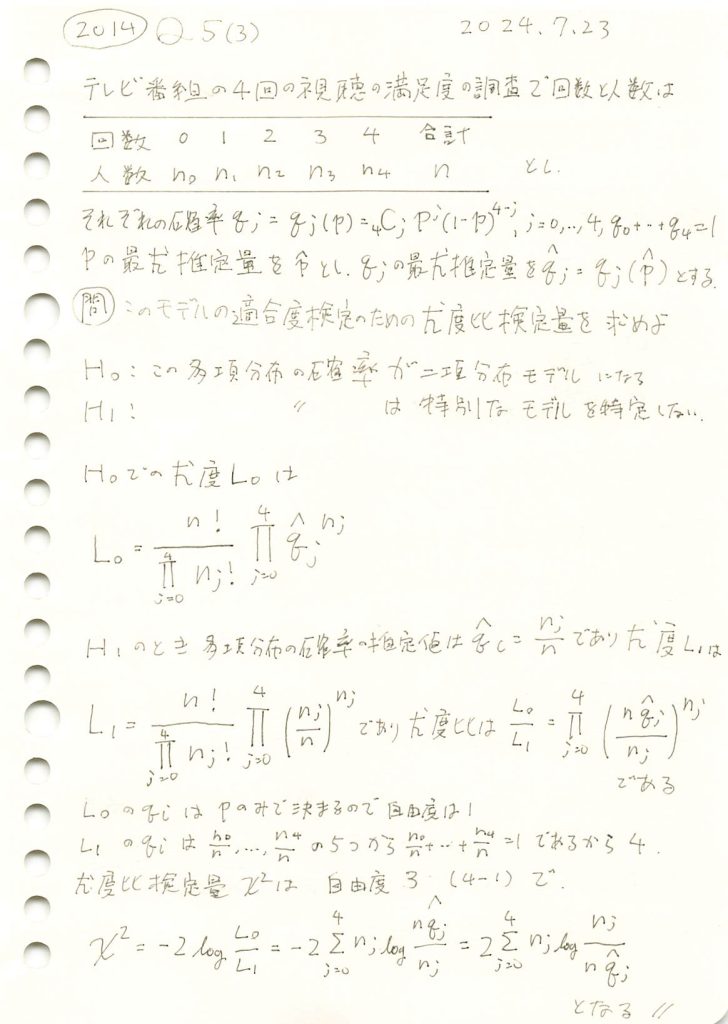
テレビ番組の視聴満足回数の調査で満足と答えた回数のそれぞれ人数の適合度検定のための尤度比検定量と自由度を求めました。
コード
多項確率![]() が、
が、![]() に忠実に基づく場合と、ランダムにノイズを加えた(ズレた)場合についてシミュレーションを行い、尤度比統計量とp-値を計算して比較します。
に忠実に基づく場合と、ランダムにノイズを加えた(ズレた)場合についてシミュレーションを行い、尤度比統計量とp-値を計算して比較します。
# 2014 Q5(3)  2025.1.17

import numpy as np
from scipy.stats import chi2
import matplotlib.pyplot as plt

# シミュレーションの設定
n = 100  # 人数
p_true = 0.6  # 真の成功確率
categories = np.arange(5)  # カテゴリ (0~4)
n_simulations = 1000  # シミュレーション回数

# 二項分布モデルに基づく q_j の計算 (忠実な設定)
qj_true = [np.math.comb(4, j) * (p_true ** j) * ((1 - p_true) ** (4 - j)) for j in categories]

# 二項分布に従わない (qj_noisy): q_j をランダムに変更してズラす
qj_noisy = np.array(qj_true) + np.random.uniform(-0.1, 0.1, size=len(qj_true))
qj_noisy = np.clip(qj_noisy, 0, None)  # 確率が0未満にならないようにする
qj_noisy = qj_noisy / np.sum(qj_noisy)  # 確率なので正規化

# 尤度比統計量を記録するリスト
likelihood_ratio_true = []
p_values_true = []
likelihood_ratio_noisy = []
p_values_noisy = []

for _ in range(n_simulations):
    # 忠実なモデルの観測データ
    obs_true = np.random.multinomial(n, qj_true)
    exp_true = n * np.array(qj_true)
    likelihood_stat_true = 2 * np.sum(obs_true * np.log(obs_true / exp_true, where=(obs_true > 0)))
    p_val_true = 1 - chi2.cdf(likelihood_stat_true, df=3)  # 自由度 = カテゴリ数 - 1 - 推定パラメータ数
    likelihood_ratio_true.append(likelihood_stat_true)
    p_values_true.append(p_val_true)

    # ズレたモデルの観測データ
    obs_noisy = np.random.multinomial(n, qj_noisy)
    exp_noisy = n * np.array(qj_true)  # 忠実な期待値を使用
    likelihood_stat_noisy = 2 * np.sum(obs_noisy * np.log(obs_noisy / exp_noisy, where=(obs_noisy > 0)))
    p_val_noisy = 1 - chi2.cdf(likelihood_stat_noisy, df=3)
    likelihood_ratio_noisy.append(likelihood_stat_noisy)
    p_values_noisy.append(p_val_noisy)

# 平均尤度比統計量を計算
mean_likelihood_true = np.mean(likelihood_ratio_true)
mean_likelihood_noisy = np.mean(likelihood_ratio_noisy)

# カイ二乗分布のPDFを計算
x = np.linspace(0, 20, 500)  # x軸の範囲
pdf = chi2.pdf(x, df=3)  # 自由度3のPDF

# 結果の出力
print(f"忠実なモデルの平均尤度比統計量: {mean_likelihood_true:.4f}")
print(f"忠実なモデルの平均p値: {np.mean(p_values_true):.4f}")
print(f"ズレたモデルの平均尤度比統計量: {mean_likelihood_noisy:.4f}")
print(f"ズレたモデルの平均p値: {np.mean(p_values_noisy):.4f}")

# グラフの描画
plt.figure(figsize=(10, 6))
plt.plot(x, pdf, label="自由度3のカイ二乗分布", linewidth=2)
plt.axvline(mean_likelihood_true, color="blue", linestyle="--", label=f"忠実モデルの平均: {mean_likelihood_true:.2f}")
plt.axvline(mean_likelihood_noisy, color="red", linestyle="--", label=f"ズレモデルの平均: {mean_likelihood_noisy:.2f}")
plt.xlabel("$X^2$ 値", fontsize=12)
plt.ylabel("確率密度", fontsize=12)
plt.title("自由度3のカイ二乗分布と平均尤度比統計量", fontsize=14)
plt.legend(fontsize=12)
plt.grid(alpha=0.5)
plt.show()
忠実なモデルの平均尤度比統計量: 3.9418
忠実なモデルの平均p値: 0.3909
ズレたモデルの平均尤度比統計量: 16.7360
ズレたモデルの平均p値: 0.0081
忠実なモデルの平均p-値は大きく、モデルによく適合していることが分かります。一方、ランダムにノイズを加えた(ズレた)モデルではp-値が0.05以下となり、モデルがデータに適合していないことが分かります。
2014 Q5(2)
テレビ番組の視聴満足回数の調査で満足と答えた回数のそれぞれ人数の適合度カイ二乗統計量と自由度を求めました。

コード
多項確率![]() が、
が、![]() に忠実に基づく場合と、ランダムにノイズを加えた(ズレた)場合についてシミュレーションを行い、適合度カイ二乗統計量とp-値を計算して比較します。
に忠実に基づく場合と、ランダムにノイズを加えた(ズレた)場合についてシミュレーションを行い、適合度カイ二乗統計量とp-値を計算して比較します。
# 2014 Q5(2)  2025.1.16

import numpy as np
from scipy.stats import chi2
import matplotlib.pyplot as plt

# シミュレーションの設定
n = 100  # 人数
p_true = 0.6  # 真の成功確率
categories = np.arange(5)  # カテゴリ (0~4)
n_simulations = 1000  # シミュレーション回数

# 二項分布モデルに基づく q_j の計算 (忠実な設定)
qj_true = [np.math.comb(4, j) * (p_true ** j) * ((1 - p_true) ** (4 - j)) for j in categories]

# 二項分布に従わない (qj_noisy): q_j をランダムに変更してズラす
qj_noisy = np.array(qj_true) + np.random.uniform(-0.1, 0.1, size=len(qj_true))
qj_noisy = np.clip(qj_noisy, 0, None)  # 確率が0未満にならないようにする
qj_noisy = qj_noisy / np.sum(qj_noisy)  # 確率なので正規化

# カイ二乗統計量と p 値を記録するリスト
chi_squared_true = []
p_values_true = []
chi_squared_noisy = []
p_values_noisy = []

for _ in range(n_simulations):
    # 忠実なモデルの観測データ
    obs_true = np.random.multinomial(n, qj_true)
    exp_true = n * np.array(qj_true)
    chi2_stat_true = np.sum((obs_true - exp_true) ** 2 / exp_true)
    p_val_true = 1 - chi2.cdf(chi2_stat_true, df=3)  # 自由度 = カテゴリ数 - 1 - 推定パラメータ数
    chi_squared_true.append(chi2_stat_true)
    p_values_true.append(p_val_true)

    # ズレたモデルの観測データ
    obs_noisy = np.random.multinomial(n, qj_noisy)
    exp_noisy = n * np.array(qj_true)  # 忠実な期待値を使用
    chi2_stat_noisy = np.sum((obs_noisy - exp_noisy) ** 2 / exp_noisy)
    p_val_noisy = 1 - chi2.cdf(chi2_stat_noisy, df=3)
    chi_squared_noisy.append(chi2_stat_noisy)
    p_values_noisy.append(p_val_noisy)

# 平均カイ二乗統計量を計算
mean_chi2_true = np.mean(chi_squared_true)
mean_chi2_noisy = np.mean(chi_squared_noisy)

# カイ二乗分布のPDFを計算
x = np.linspace(0, 20, 500)  # x軸の範囲
pdf = chi2.pdf(x, df=3)  # 自由度3のPDF

# 結果の出力
print(f"忠実なモデルの平均カイ二乗統計量: {mean_chi2_true:.4f}")
print(f"忠実なモデルの平均p値: {np.mean(p_values_true):.4f}")
print(f"ズレたモデルの平均カイ二乗統計量: {mean_chi2_noisy:.4f}")
print(f"ズレたモデルの平均p値: {np.mean(p_values_noisy):.4f}")

# グラフの描画
plt.figure(figsize=(10, 6))
plt.plot(x, pdf, label="自由度3のカイ二乗分布", linewidth=2)
plt.axvline(mean_chi2_true, color="blue", linestyle="--", label=f"忠実モデルの平均: {mean_chi2_true:.2f}")
plt.axvline(mean_chi2_noisy, color="red", linestyle="--", label=f"ズレモデルの平均: {mean_chi2_noisy:.2f}")
plt.xlabel("$X^2$ 値", fontsize=12)
plt.ylabel("確率密度", fontsize=12)
plt.title("自由度3のカイ二乗分布と平均カイ二乗統計量", fontsize=14)
plt.legend(fontsize=12)
plt.grid(alpha=0.5)
plt.show()
忠実なモデルの平均カイ二乗統計量: 3.8112
忠実なモデルの平均p値: 0.4026
ズレたモデルの平均カイ二乗統計量: 13.4317
ズレたモデルの平均p値: 0.0236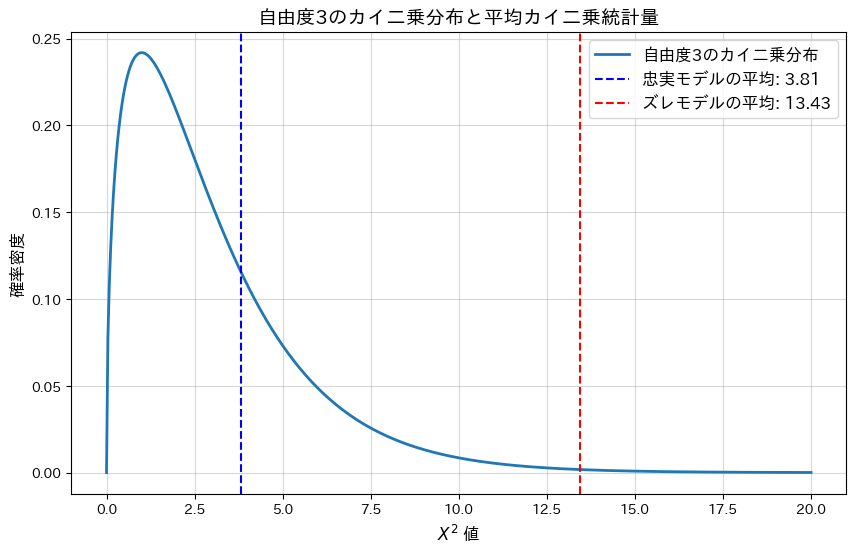
忠実なモデルの平均p-値は大きく、モデルによく適合していることが分かります。一方、ランダムにノイズを加えた(ズレた)モデルではp-値が0.05以下となり、モデルがデータに適合していないことが分かります。
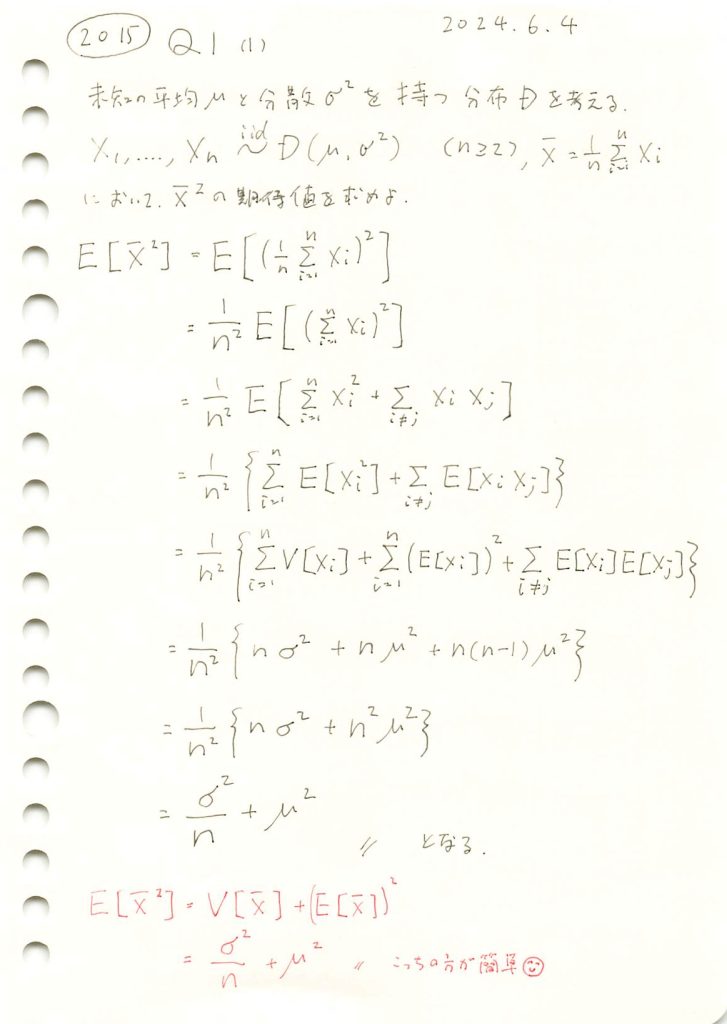
2015 Q1(1)
任意の分布に従う確率変数の平均の二乗の期待値を求めました。
コード
![]() を確かめるためにシミュレーションを行います。nを変化させながら乱数を発生させ、計算した
を確かめるためにシミュレーションを行います。nを変化させながら乱数を発生させ、計算した![]() を理論値(非心カイ二乗分布)と比較し、プロットしてみます。
を理論値(非心カイ二乗分布)と比較し、プロットしてみます。
#2015 Q1(1)  2024.12.2

import numpy as np
import matplotlib.pyplot as plt
from scipy.stats import ncx2

# パラメータ設定(nを複数用意)
n_values = [5, 10, 20, 50]  # 標本サイズのリスト
mu = 4  # 母平均
sigma2 = 5  # 母分散
sigma = np.sqrt(sigma2)  # 母標準偏差
num_simulations = 10000  # シミュレーション回数

# 暖色系カラーパレットの設定
colors = plt.cm.autumn(np.linspace(0, 1, len(n_values)))

# 描画の準備
plt.figure(figsize=(10, 8))

# 結果格納用
results = []

# nごとに分布をシミュレーションし、プロット
for i, n in enumerate(n_values):
    # シミュレーションによる標本平均の二乗 (X̄^2) の生成
    sample_means_squared = np.array([
        np.mean(np.random.normal(mu, sigma, n))**2 for _ in range(num_simulations)
    ])

    # シミュレーションによる期待値 E[X̄^2] の計算
    simulated_mean = np.mean(sample_means_squared)

    # 理論値の計算
    theoretical_mean = sigma2 / n + mu**2

    # 結果を記録
    results.append((n, theoretical_mean, simulated_mean))

    # ヒストグラムをプロット
    plt.hist(
        sample_means_squared, bins=30, density=True, alpha=0.5,
        label=f"n={n}, 理論値: {theoretical_mean:.3f}, シミュレーション値: {simulated_mean:.3f}",
        color=colors[i]
    )

    # 非心カイ二乗分布のPDFをプロット
    x_values = np.linspace(0, np.max(sample_means_squared), 1000)
    df = 1  # 自由度は標本平均の二乗の場合、1となる
    nc = (n * mu**2) / sigma2  # 非心度 λ
    theoretical_pdf = ncx2.pdf(x_values, df, nc, scale=sigma2 / n)


    plt.plot(
        x_values, theoretical_pdf, linewidth=2, label=f"n={n} の非心カイ二乗分布", color=colors[i]
    )
# グラフ
plt.title("標本平均の二乗 ($\\overline{X}^2$) の分布と非心カイ二乗分布")
plt.xlabel("$\\overline{X}^2$")
plt.ylabel("密度")
plt.legend()
plt.grid()
plt.show()
シミュレーションの結果、![]() と
と![]() は概ね一致しました。また
は概ね一致しました。また![]() の分布は理論値(非心カイ二乗分布)の形状とよく重なっていることが確認できました。
の分布は理論値(非心カイ二乗分布)の形状とよく重なっていることが確認できました。
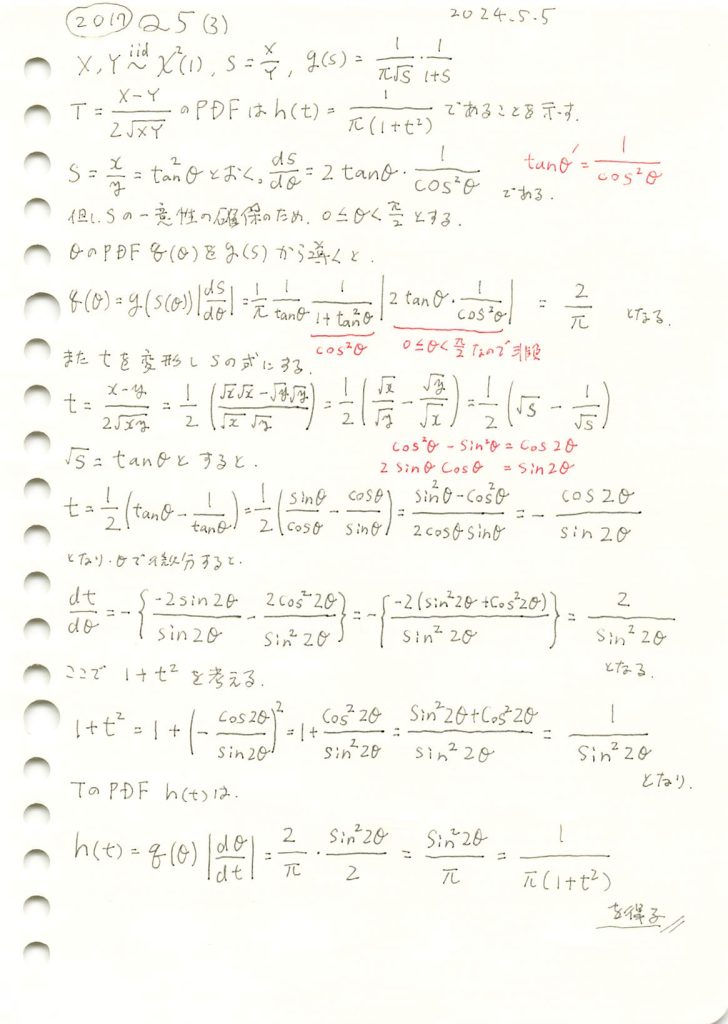
2017 Q5(3)
独立した二つの自由度1のカイ二乗分布の差を幾何平均と2でスケールした式の確率密度関数を導出しました。
コード
Tについてシミュレーションし、確率密度関数![]() と一致するか確認をします。
と一致するか確認をします。
# 2017 Q5(3)  2024.11.10

import numpy as np
import matplotlib.pyplot as plt

# サンプルサイズ
n_samples = 100000

# 自由度1のカイ二乗分布からサンプルを生成
X = np.random.chisquare(df=1, size=n_samples)
Y = np.random.chisquare(df=1, size=n_samples)

# 確率変数 T = (X - Y) / (2 * sqrt(X * Y)) の計算
T = (X - Y) / (2 * np.sqrt(X * Y))

# 理論的な確率密度関数 h(t) の定義
def theoretical_h(t):
    return 1 / (np.pi * (1 + t**2))

# x 軸の範囲を設定し、h(t) を計算
x = np.linspace(-10, 10, 100)
h_t = theoretical_h(x)

# グラフの描画
plt.hist(T, bins=200, density=True, alpha=0.5, range=(-10, 10), label='シミュレーションによる $T$')
plt.plot(x, h_t, 'r-', label='理論的な $h(t) = \\frac{1}{\\pi(1+t^2)}$')
plt.xlabel('$T$')
plt.ylabel('密度')
plt.legend()
plt.title('確率変数 $T$ のシミュレーションと理論密度関数')
plt.show()
Tの分布は確率密度関数![]() と一致することが確認できました。
と一致することが確認できました。
なお、Tの分布は標準コーシー分布と呼ばれます。
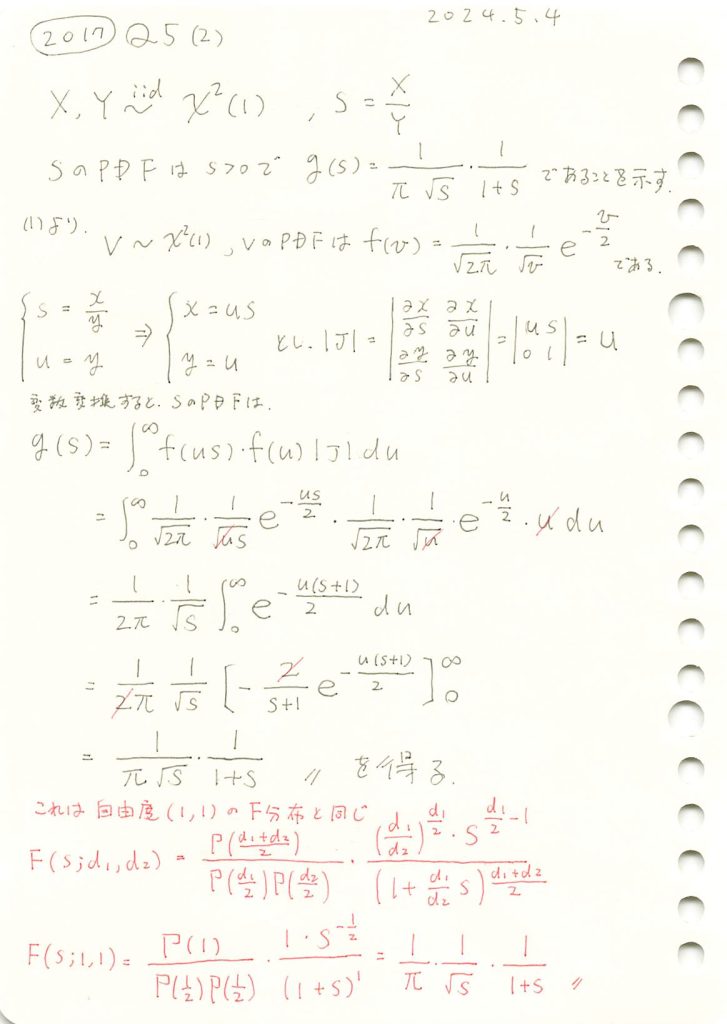
2017 Q5(2)
独立した二つの自由度1のカイ二乗分布の比の確率密度関数を導出し、F(1,1)分布と同じであることを確認しました。
コード
Sについてシミュレーションし、確率密度関数![]() と一致するか確認をします。
と一致するか確認をします。
# 2017 Q5(2)  2024.11.9

import numpy as np
import matplotlib.pyplot as plt

# サンプルサイズ
n_samples = 100000

# 自由度1のカイ二乗分布からサンプルを生成
X = np.random.chisquare(df=1, size=n_samples)
Y = np.random.chisquare(df=1, size=n_samples)

# 確率変数 S = X / Y の計算
S = X / Y

# 理論的な確率密度関数 g(s) の定義
def theoretical_g(s):
    return (1 / (np.pi * np.sqrt(s) * (1 + s)))

# x 軸の範囲を設定し、g(s) を計算
x = np.linspace(0.01, 10, 100)  # 0.01から10の範囲に制限
g_s = theoretical_g(x)

# ヒストグラムの描画
plt.hist(S, bins=200, density=True, alpha=0.5, range=(0, 10), label='シミュレーションによる $S=X/Y$')
plt.plot(x, g_s, 'r-', label='理論的な $g(s) = \\frac{1}{\\pi \\sqrt{s}} \\cdot \\frac{1}{1+s}$')
plt.xlabel('$S$')
plt.ylabel('密度')
plt.legend()
plt.title('確率変数 $S=X/Y$ のシミュレーションと理論密度関数')
plt.show()
Sの分布は確率密度関数![]() と一致することが確認できました。
と一致することが確認できました。
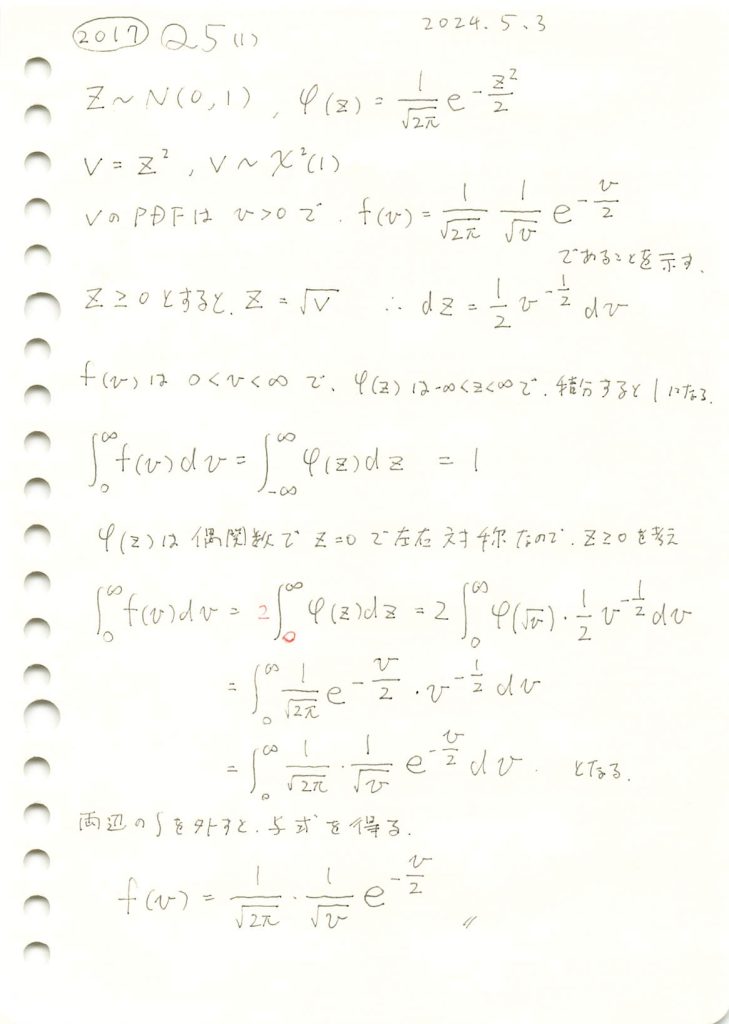
2017 Q5(1)
標準正規分布から自由度1のカイ二乗分布の確率密度関数を導出しました。
コード
Vについてシミュレーションし、確率密度関数![]() と一致するか確認をします。
と一致するか確認をします。
# 2017 Q5(1)  2024.11.8

import numpy as np
import matplotlib.pyplot as plt

# サンプルサイズ
n_samples = 10000

# 標準正規分布 N(0, 1) からサンプルを生成
Z = np.random.normal(0, 1, n_samples)

# Z を二乗して V を計算
V = Z**2

# 導いた理論的な確率密度関数 f(v) の定義
def theoretical_pdf(v):
    return (1 / np.sqrt(2 * np.pi)) * (1 / np.sqrt(v)) * np.exp(-v / 2)

# x 軸の範囲を設定し、f(v) を計算
x = np.linspace(0.01, 10, 100)  # 0に近い値での計算エラーを避けるため0.01から
f_v = theoretical_pdf(x)

# ヒストグラムの描画
plt.hist(V, bins=200, density=True, alpha=0.5, label='シミュレーションによる $V=Z^2$')
plt.plot(x, f_v, 'r-', label='理論的な $f(v) = \\frac{1}{\\sqrt{2\\pi}} \\cdot \\frac{1}{\\sqrt{v}} e^{-v/2}$')
plt.xlabel('$V$')
plt.ylabel('密度')
plt.legend()
plt.title('自由度1のカイ二乗分布に従う $V=Z^2$ のシミュレーションと理論密度関数')
plt.show()
Vの分布は確率密度関数![]() と一致することが確認できました。
と一致することが確認できました。
2018 Q1(3)
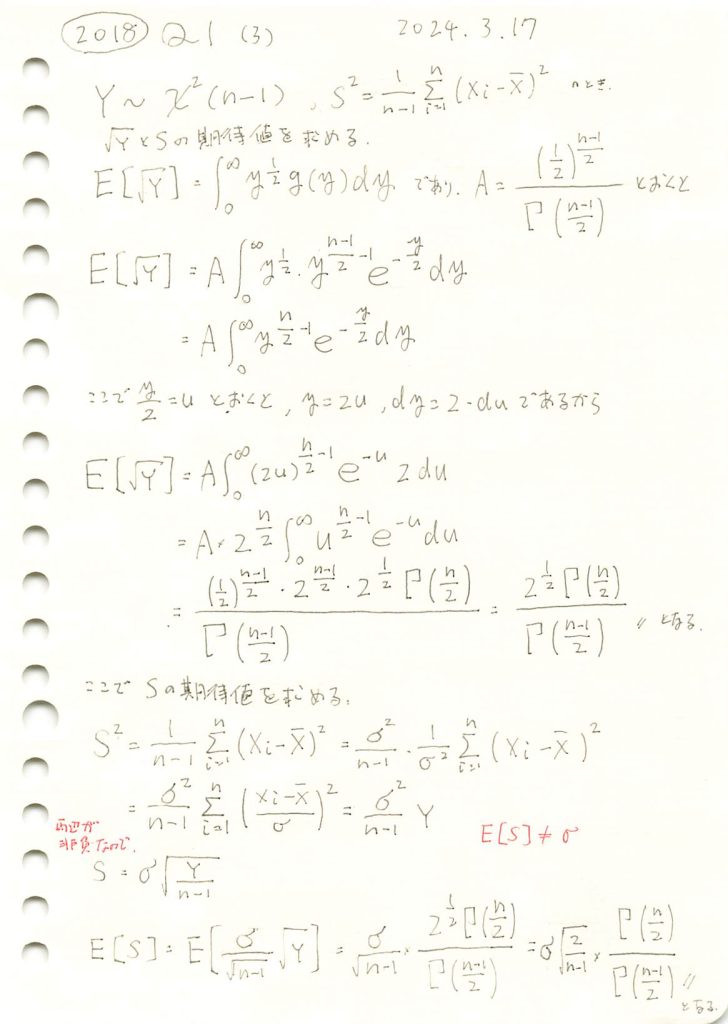
カイ二乗分布の平方根の期待値と標本標準偏差の期待値を求めました。不偏分散の期待値は母分散なのにその平方根の期待値は母標準偏差にはならないのが面白い。
コード
数式を使って期待値E[√Y]とE[S]を求めます。
# 2018 Q1(3)  2024.10.3

import sympy as sp

# 変数の定義
y, n, sigma = sp.symbols('y n sigma', positive=True)
k = n - 1  # 自由度

# カイ二乗分布の確率密度関数 g(y)
g_y = (1/2)**(k/2) * y**(k/2 - 1) * sp.exp(-y/2) / sp.gamma(k/2)

# 平方根の期待値 E[√Y] の積分を計算
E_sqrt_Y = sp.integrate(sp.sqrt(y) * g_y, (y, 0, sp.oo))

# 標本標準偏差 S の期待値 E[S] を計算
E_S = sigma * E_sqrt_Y / sp.sqrt(n-1)

# 結果の表示
display(E_sqrt_Y.simplify())  # E[√Y] の表示
display(E_S.simplify())       # E[S] の表示
余分な1.0^nが含まれますが手計算と一致しました。
次に、期待値E[√Y]とE[S]を数値シミュレーションで求めてみます。
# 2018 Q1(3)  2024.10.3

import numpy as np
import matplotlib.pyplot as plt
from scipy.special import gamma

# パラメータ設定
n = 10  # サンプルサイズ (自由度は n-1)
degrees_of_freedom = n - 1  # 自由度
sigma = 2  # 母標準偏差
num_simulations = 10000  # シミュレーションの回数

# カイ二乗分布に従う乱数を生成
chi_squared_samples = np.random.chisquare(df=degrees_of_freedom, size=num_simulations)

# 平方根 E[√Y] のシミュレーション
sqrt_Y_simulation = np.mean(np.sqrt(chi_squared_samples))

# 標本標準偏差 S のシミュレーション
S_simulation = np.mean(sigma * np.sqrt(chi_squared_samples / (n - 1)))

# 理論値 E[√Y] と E[S] の計算
E_sqrt_Y_theoretical = np.sqrt(2) * gamma(n / 2) / gamma((n - 1) / 2)
E_S_theoretical = sigma * np.sqrt(2 / (n - 1)) * gamma(n / 2) / gamma((n - 1) / 2)

# 結果表示
print(f"平方根 E[√Y] の理論値: {E_sqrt_Y_theoretical:.4f}")
print(f"平方根 E[√Y] のシミュレーション結果: {sqrt_Y_simulation:.4f}")
print(f"標本標準偏差 E[S] の理論値: {E_S_theoretical:.4f}")
print(f"標本標準偏差 E[S] のシミュレーション結果: {S_simulation:.4f}")

# ヒストグラムの描画
plt.figure(figsize=(10, 6))

# 平方根 E[√Y] のヒストグラム
plt.hist(np.sqrt(chi_squared_samples), bins=50, alpha=0.5, color='b', edgecolor='black', label='sqrt(Y) サンプル', density=True)

# 標本標準偏差 E[S] のヒストグラム
plt.hist(sigma * np.sqrt(chi_squared_samples / (n - 1)), bins=50, alpha=0.5, color='r', edgecolor='black', label='S サンプル', density=True)

# 平方根 E[√Y] の理論値の線
plt.axvline(E_sqrt_Y_theoretical, color='blue', linestyle='dashed', linewidth=2, label='理論 E[√Y]')

# 標本標準偏差 E[S] の理論値の線
plt.axvline(E_S_theoretical, color='red', linestyle='dashed', linewidth=2, label='理論 E[S]')

# グラフの設定
plt.title('平方根 E[√Y] と 標本標準偏差 E[S] の分布')
plt.xlabel('値')
plt.ylabel('頻度')
plt.legend()
plt.grid(True)
plt.show()
平方根 E[√Y] の理論値: 2.9180
平方根 E[√Y] のシミュレーション結果: 2.9222
標本標準偏差 E[S] の理論値: 1.9453
標本標準偏差 E[S] のシミュレーション結果: 1.9481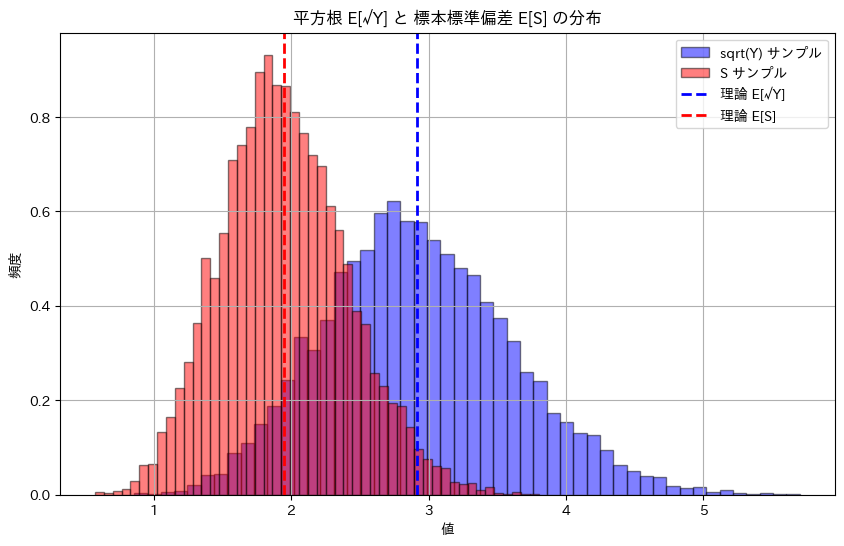
シミュレーションによる期待値E[√Y]とE[S]は理論値に近い値をとりました。E[S^2]=σ^2であっても面白いことにE[S]=σにはならない。上の例ではσ=2ですがシミュレーションと一致しません。標本標準偏差 Sは母標準偏差 σの不偏推定量ではないためです。
2018 Q1(2)-3
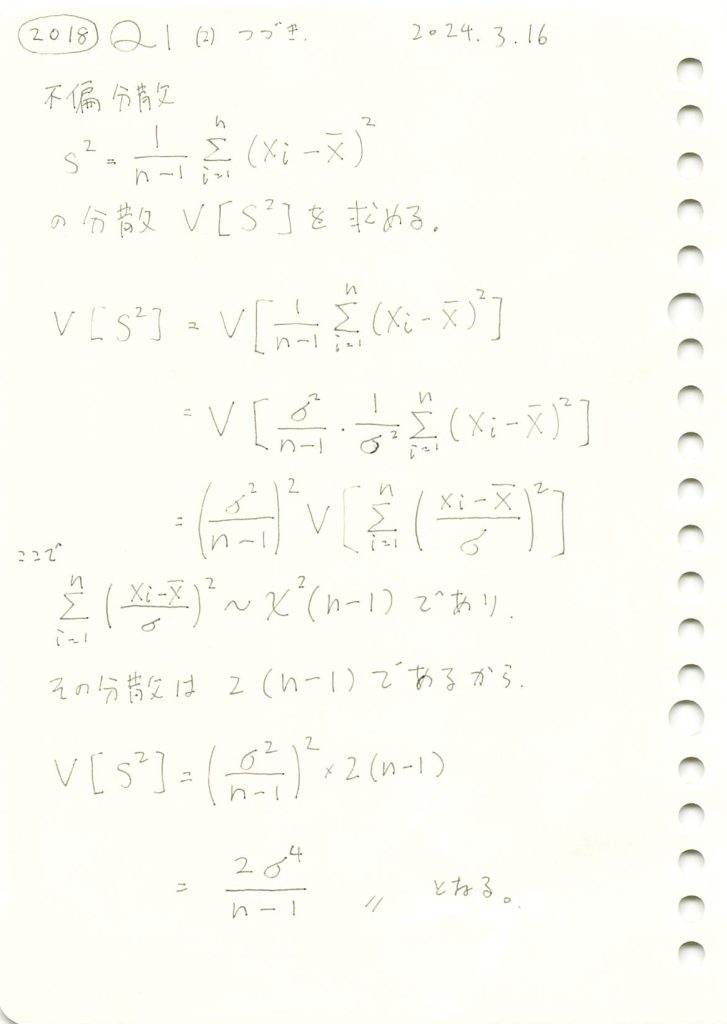
不偏分散の分散を求めました。
コード
数値シミュレーションにより標本分散の分散を求めてみます。
# 2018 Q1(2)  2024.10.2

import numpy as np
import matplotlib.pyplot as plt

# パラメータ設定
sigma = 2   # 母分散の標準偏差
sigma_squared = sigma ** 2  # 母分散
n = 30      # サンプルサイズ
num_simulations = 10000  # シミュレーションの回数

# 理論上の標本分散の分散 Var(S^2)
theoretical_variance = (2 * sigma_squared ** 2) / (n - 1)

# シミュレーション結果を保存するリスト
sample_variances = []

# シミュレーションを繰り返す
for _ in range(num_simulations):
    # 正規分布 N(0, sigma^2) に従うサンプルを生成
    sample = np.random.normal(0, sigma, n)

    # 標本平均
    sample_mean = np.mean(sample)

    # 標本分散 (S^2)
    sample_variance = np.sum((sample - sample_mean) ** 2) / (n - 1)

    # 計算した標本分散をリストに追加
    sample_variances.append(sample_variance)

# サンプル分散の分散を計算
empirical_variance = np.var(sample_variances)

# 結果表示
print(f"理論的な標本分散の分散: {theoretical_variance:.4f}")
print(f"シミュレーションで得られた標本分散の分散: {empirical_variance:.4f}")

# ヒストグラムを描画して標本分散の分布を確認
plt.hist(sample_variances, bins=50, alpha=0.7, color='b', edgecolor='black')
plt.axvline(np.mean(sample_variances), color='r', linestyle='dashed', linewidth=2, label='平均分散')
plt.title('標本分散の分布')
plt.xlabel('標本分散 S^2')
plt.ylabel('頻度')
plt.legend()
plt.grid(True)
plt.show()
理論的な標本分散の分散: 1.1034
シミュレーションで得られた標本分散の分散: 1.1286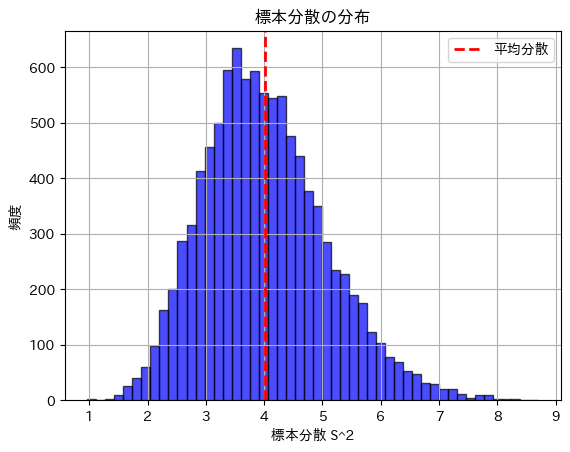
標本分散の分散は理論値に近い値になりました。
2018 Q1(2)-2
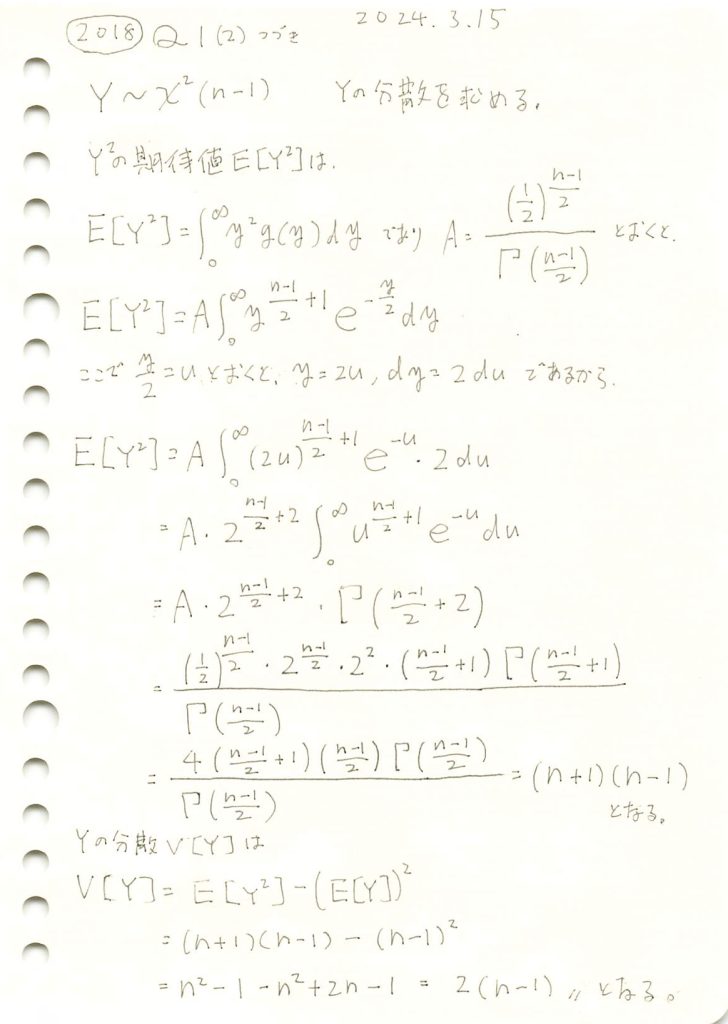
カイ二乗分布の分散を求めました。
コード
数値シミュレーションにより、n=10(自由度9)のカイ二乗分布の期待値と分散を求めてみます。
# 2018 Q1(2)  2024.10.2

import numpy as np
import matplotlib.pyplot as plt

# パラメータ設定
n = 10  # サンプルサイズ (自由度は n-1)
degrees_of_freedom = n - 1  # 自由度
num_simulations = 10000  # シミュレーションの回数

# カイ二乗分布に従うランダム変数を生成
chi_squared_samples = np.random.chisquare(df=degrees_of_freedom, size=num_simulations)

# 期待値と分散を計算
empirical_mean = np.mean(chi_squared_samples)
empirical_variance = np.var(chi_squared_samples)

# 理論値
theoretical_mean = degrees_of_freedom  # 期待値 E[Y] = n-1
theoretical_variance = 2 * degrees_of_freedom  # 分散 Var(Y) = 2(n-1)

# 結果表示
print(f"カイ二乗分布の期待値 (理論): {theoretical_mean:.4f}")
print(f"カイ二乗分布の期待値 (シミュレーション): {empirical_mean:.4f}")
print(f"カイ二乗分布の分散 (理論): {theoretical_variance:.4f}")
print(f"カイ二乗分布の分散 (シミュレーション): {empirical_variance:.4f}")

# ヒストグラムを描画して確認
plt.hist(chi_squared_samples, bins=50, alpha=0.7, color='b', edgecolor='black')
plt.axvline(empirical_mean, color='r', linestyle='dashed', linewidth=2, label='シミュレーション平均')
plt.axvline(theoretical_mean, color='g', linestyle='dashed', linewidth=2, label='理論平均')
plt.title('カイ二乗分布 (自由度 10-1)')
plt.xlabel('値')
plt.ylabel('頻度')
plt.legend()
plt.grid(True)
plt.show()
カイ二乗分布の期待値 (理論): 9.0000
カイ二乗分布の期待値 (シミュレーション): 8.9728
カイ二乗分布の分散 (理論): 18.0000
カイ二乗分布の分散 (シミュレーション): 18.3530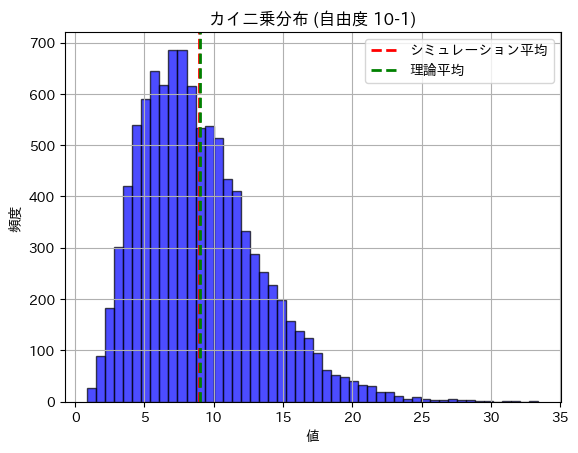
期待値と分散は理論値に近い値になりました。